Showing posts with label microcontroller. Show all posts

Sunday, March 6, 2011

Easy coding for Hitachi HD44780 LCD using open source of PIC compiler


Hitachi HD44780 became standard for microcontroller hobbyist because it was easy to use and cheap in price. That make GCBasic support it. So here I glad to share a tutorial how to code LCD using GCBasic.
This type of LCD can use in two mode; 4 bit mode and 8 bit mode. The different between two is 4 bit mode requires less wire connection than 8 bit mode. In this tutorial I use 4-bit mode and the circuit as below.
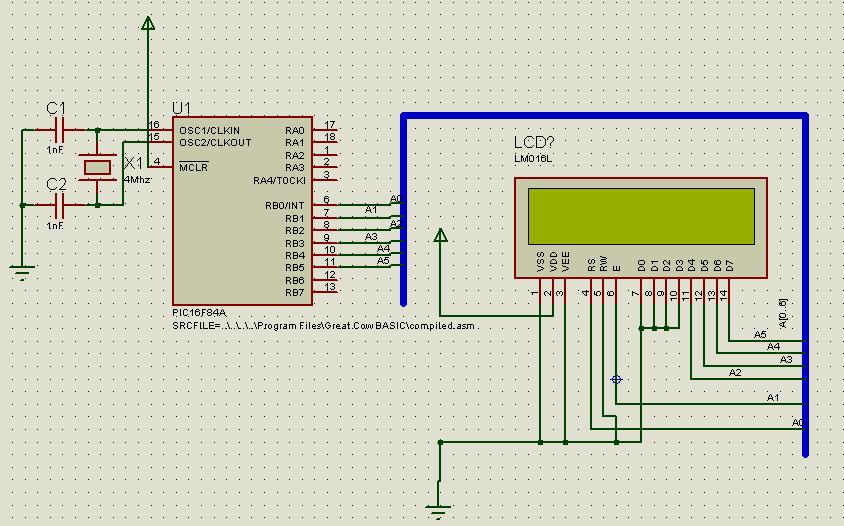


I discover that using this compiler more easily than using PicBasic Pro. It only requires 8 lines of definition and the LCD ready to work. The definition code as below:

'Chip model
#chip 16F84A, 4                                 ‘I use 16F84A chip
#define LCD_IO 4                               ‘tell the compiler to use 4-bit mode
#define LCD_RS PORTB.0                 ‘set Register Select to Port B pin 0
#define LCD_NO_RW                        ‘tell the compiler Read/Write pin is ground
#define LCD_Enable PORTB.1          ‘set Enable pin to Port B pin 1
#define LCD_DB4 PORTB.2               ‘set D4 to Port B pin 2 and so on…
#define LCD_DB5 PORTB.3
#define LCD_DB6 PORTB.4
#define LCD_DB7 PORTB.5

After that you can start to display any text or number at your LCD. Use Print command to display the text or number as below but you must put Locate command as well to tell the compiler where to put the text. The syntax of Locate is Locate line, column.

Locate 0, 0
Print "Hello World"
wait 10 ms

And the last part is to make an animation of star. The code is below.

For StarPos = 0 To 16
If StarPos = 0 Then
Put 0, 16, 32
Put 0, 0, 42
Else
Put 0, StarPos - 1, 32
Put 0, StarPos, 42
End If
Wait 250 ms
Next

Now you can compiler the code and test it. You can have more info here


Full code as below :

'Chip model
#chip 16F84A, 4

#define LCD_IO 4
#define LCD_RS PORTB.0
#define LCD_NO_RW
#define LCD_Enable PORTB.1
#define LCD_DB4 PORTB.2
#define LCD_DB5 PORTB.3
#define LCD_DB6 PORTB.4
#define LCD_DB7 PORTB.5


Locate 0, 0
Print "Hello World"
wait 10 ms


For StarPos = 0 To 16
If StarPos = 0 Then
Put 0, 16, 32
Put 0, 0, 42
Else
Put 0, StarPos - 1, 32
Put 0, StarPos, 42
End If
Wait 250 ms
Next

Monday, September 27, 2010

3 Step to setup microcontroller project

Electronic projects will not complete without microcontroller. It is the most easier and low cost project you could ever build. You only need to program and it will run accordingly. However if you want to start microcontroller projects you need only three step to setup a project as describe below.

1. Need microcontroller
Microcontroller is small device consists of CPU, memory (RAM and ROM), I/O port, serial and parallel port, timers, and some type of microcontroller have built in Analog to Digital (A/D) and Digital to Analog (D/A). The cost of single microcontroller relatively is cheap compare to microprocessor.

For the mean time I only focus microcontroller of PIC. After this I will write the tutorial only for PIC16F84A and PIC16F877A. This PIC is the easiest to setup and to program for the beginner.

If you search through internet you will get more type of microcontroller. After all is up to you to decide the best. I suggest for the beginner you can start with PIC to gain an experience.

2. Compiler
Before I go too far it is better I introduce the compiler. The compiler will able a user to program in high-level language. It is using English style language and easier than assembly language.

As student or beginner user, I prefer to use open source compiler. There are varieties of open source compiler available in internet. The popular open source compiler is Small Device C compiler (SDCC) or Great Cow Basic (GCBASIC). SDCC is using C language and GCBASIC using Basic language.

The compiler also will execute your program and produce hex file. The hex file is binary code. It will upload to your microcontroller using programmer. It also produce assembly file. The file could use to simulate your code using simulation program.

3. Programmer
Programmer consists of software and hardware to upload hex file into microcontroller. The software is a program to communicate with programmer hardware via serial or parallel communication. It will take hex file produce by compiler to upload into microcontroller.

The programmer hardware however is to burn binary code from hex file into ROM of microcontroller. After it successfully burned the microcontroller is ready to use.

Software and hardware programmer have varieties type in market. You can buy or build it yourself. There are many circuits available in internet to setup hardware yourself and download software freely. The most popular software and hardware of programmer is at http://www.winpicprog.co.uk/

Finally I hope that you now have an idea how to setup microcontroller project. I also will try to put some tutorial to program microcontroller. The compiler that I used is GCBASIC compiler.